
DIY for All Screened-In Porches - Winter Edition
Although the weather is cooling down and the season of staying indoors and sipping hot cocoa is upon us, there are still plenty of amazing DIY’s that you can start working on now for your screened porches. Some of these DIY’s may be seasonally-related, others may just be new additions for years to come. Regardless of how long your new projects stay up, they are sure to make your screened porches come to life! Check out these awesome winter-edition DIY’s for your screened porches below.

What you will need:
A sturdy pot/holder/bod
Plant foam
Mixed foliage (Evergreen, sticks/twigs, birch, magnolia, small flowering plants, etc.)
Lights (Optional)
Instructions:
Place the empty plant holder in your desired location.
Place plant foam down within the empty planter.
Begin layering plants and wood into the planter, ensuring that the ends are going deep into the plant foam within the planter.
Once the foliage has reached your desired height and appearance, add lights if desired.

What you will need:
Cardboard
Duct tape
White and black paint
Additional decorations
Instructions:
For the temporary version, you will cut out of cardboard:
1 section that is 4’ x 6’
2 sections that are 1’ x 6’
1 section that is 4’ x 6’ with an arch cut out of the front
2 sections that are 1’ x ~5’ (to create the inner fireplace walls)
Using the duct tape, assemble the cardboard pieces together so that the 4’ x 6’ piece is on the back, the 2 1’ x 6’ pieces are on the sides, the arched 4’ x 6’ piece is on the front and the 2 1’ x ~5’ pieces are curved within the inner part of the fireplace.
Once assembled, used black and white paint (or other paint colors of choice) to paint a brick-appearance onto the outside of the fireplace. Paint the inside of the fireplace black.
Once the paint is dry, add decorations to the inside and outside of the fireplace.
What you will need:
Mason jars
Greenery
Epsom salts
Silver glitter
Twine
Tacky glue
Hot glue
Tea lights
Polyurethane sealer spray
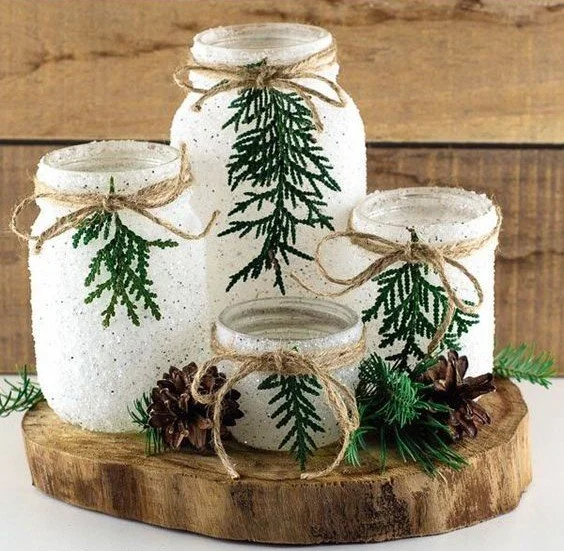
Instructions:
In a plastic container combine 1 cup of Epsom salts and 1 to 1 1/2 tablespoons of silver glitter. Stir until it’s well combined.
Apply a thin layer of tacky glue over the mason jar with a foam brush.
Once the mason jar has been coated in glue, roll it in the mixture of Epsom salts and glitter.
Once the mason jar has been coated well, place it onto some parchment paper to dry. It’s best to let the jars sit overnight to fully dry before the next step.
When the snowy mason jars have dried, spray them with a polyurethane sealer. This helps to keep the Epsom salts from falling off the jars.
Then set them back on the parchment paper until they are fully dry.
Now it’s time to have fun decorating your snowy mason jar luminaries! You can use any kind of greenery you have. Even fake greens will work.
Cut the greens into small sections and attach to the top of the jar with a small dot of hot glue.
Wrap a length of twine around the rim of the mason jar a few times and tie it into a bow.
Add a tea light, and your new snowy mason jar is complete!

What you will need:
4 craft crates
Screws (or heavy-duty adhesive)
Optional (wood stain)
Instructions:
Take your 4 craft crates and lay them out so that all open sides are facing out and all closed sides are facing inwards. Once done, align the crates so that half of the bottom is layered onto the next crate, and one side is layered onto the other crate, as shown above.
Using either screws or strong adhesive, secure your craft crates into this position. Add additional screws/adhesive as deemed necessary for structural integrity.
Once attached, apply the wood stain (optional).
Relocate your new crate table to the desired location and add modifications as desired.

What you will need:
(14) 2x3s @ 8 ft
(1) 2×4 @ 8 ft
(1) 2×2 @ 8 ft
1/4″ plywood @ 36″ x 73″
2.5″ Kreg pocket hole screws
Wood glue
2″ screws
Wood filler
Pocket hole plugs
Sandpaper
Stain or paint and sealer of your choice
Twin mattress
Instructions:
Use a miter saw to make the following cuts from 2x3s for the daybed frame:
4 @ 28.5″ for the legs
4 @ 34.5″ for the side frames
2 @ 72″ for the back frame
1 @ 75″ for the front
8 @ 36.5″ for the slats
Use a miter saw to make the following cut from the 2×2:
2 @ 28.5 for the back
Add two pocket holes with your Kreg Jig to each end of the 34.5″ pieces.
Use 2.5″ Kreg screws to connect two 34.5″ boards between the two 28.5″ legs. The lower crossbar should be 7.5″ from the bottom of the leg.
Repeat for the second side of the daybed.
Next we are going to form the Xs for each side. It works best to measure these as you go to make sure your pieces fit well. Use a miter saw to cut a 20 degree angle at one end of a 2×3 board that is at least 38″ long.
Set this in place inside one of the frames you made and mark where the second cut needs to be made. Use a miter saw to cut along the mark you made.
Next make the two shorter crosspieces. Cut a 20 degree angle on one end of each. Then fit them in place and mark where the inner side needs to be cut. Make the cut using your miter saw. Use your Kreg jig to add pocket holes to the outer ends of each crosspiece. Attach these to the frame using wood glue and 2.5″ Kreg screws. I chose to use a small finishing nail to attach the two smaller cross pieces at the center of the X rather than pocket holes for a cleaner look.
Add two pocket holes with your Kreg Jig to each end of the 72″ pieces and use 2.5″ Kreg screws to connect them to the two 28.5″ 2×2 legs. Again, the lower bar will be 7.5″ from the bottom of the legs. Cut a 2×3 at 16″ to form the middle brace. Add a pocket hole to each end of this board and attach it to the center of the back frame using 2.5″ Kreg screws. That completes the outer frame for the back of the daybed.
Lay the back flat on the ground and line up one of the sides next to it. Mark where you will be drilling holes to attach the side to the back. Pre Drill 2 holes straight through the side at the top and two more at the bottom. Use 2″ wood screws to attach the side to the back. Repeat for the second side.
Add two pocket holes with your Kreg Jig to each end of the 75″ 2×3 you cut earlier. This will form the front of the daybed. Attach it to the two sides with 2.5″ Kreg screws.
Next you are going to attach the 36.5″ slats you cut earlier. Add two pocket holes to each end of the slats. Then attach them to the frame using 2.5″ Kreg screws.
We are going to cut and attach the boards that sit on top of the sides and back of the daybed. This gives the daybed a much more finished look. Cut one 2×3 80″ long for the back and two 2x4s 38.5″ long for the two sides. Set these in place and make sure they fit well.
Finally, you may choose to add a piece of 1/4″ plywood to the bottom of your daybed for added stability if needed. Just add your mattress, backfill miscellaneous holes with wood glue or pocket hole plugs, and you have a daybed!
Let us know which one of these DIY projects is your favorite and if you try it out!
Tag us or DM us on social media for a chance to be featured.
Instagram: @screeneze
Facebook: @SCREENEZE
Twitter: @SCREENEZE